My oldest son just started his first year of AYSO soccer. Before now, I have never attended a soccer game or seen these banners, so I went into this blind. My purpose in writing this is to document comprehensively how I went about making this banner so that others can go about the process more efficiently than I did, learning from what I did well or not-so-well. I will leave the comments section open so others can share their tips and suggestions for how to do things better or more efficiently. I am including my timeline and costs, and welcome feedback on those aspects as well.
So first, I’ll give some background on my situation. The
local AYSO organization sent emails in July saying that my son had been
assigned to a team that did not yet have a coach, and that if no one stepped up
to be coach, his team would not be able to play. Now I know nothing about
soccer or coaching. Furthermore, I have no athletic abilities. On top of it
all, I have little patience for my own children and none for other people’s
children. I have no business attempting to step up to coach a soccer team.
After several of these emails alerting us to the no-coach situation and then
several weeks of radio silence, I contacted the point person with our local
organization to get an update. He let me know that someone in fact had stepped
up to be the coach and would be getting in touch. I let the rep know that I was
grateful because I was thoroughly unqualified to coach, and would be willing to
help in any other way. He told me that there would be opportunities for parent
involvement and to get involved that way.
Fast forward to August 27, our first team meeting and
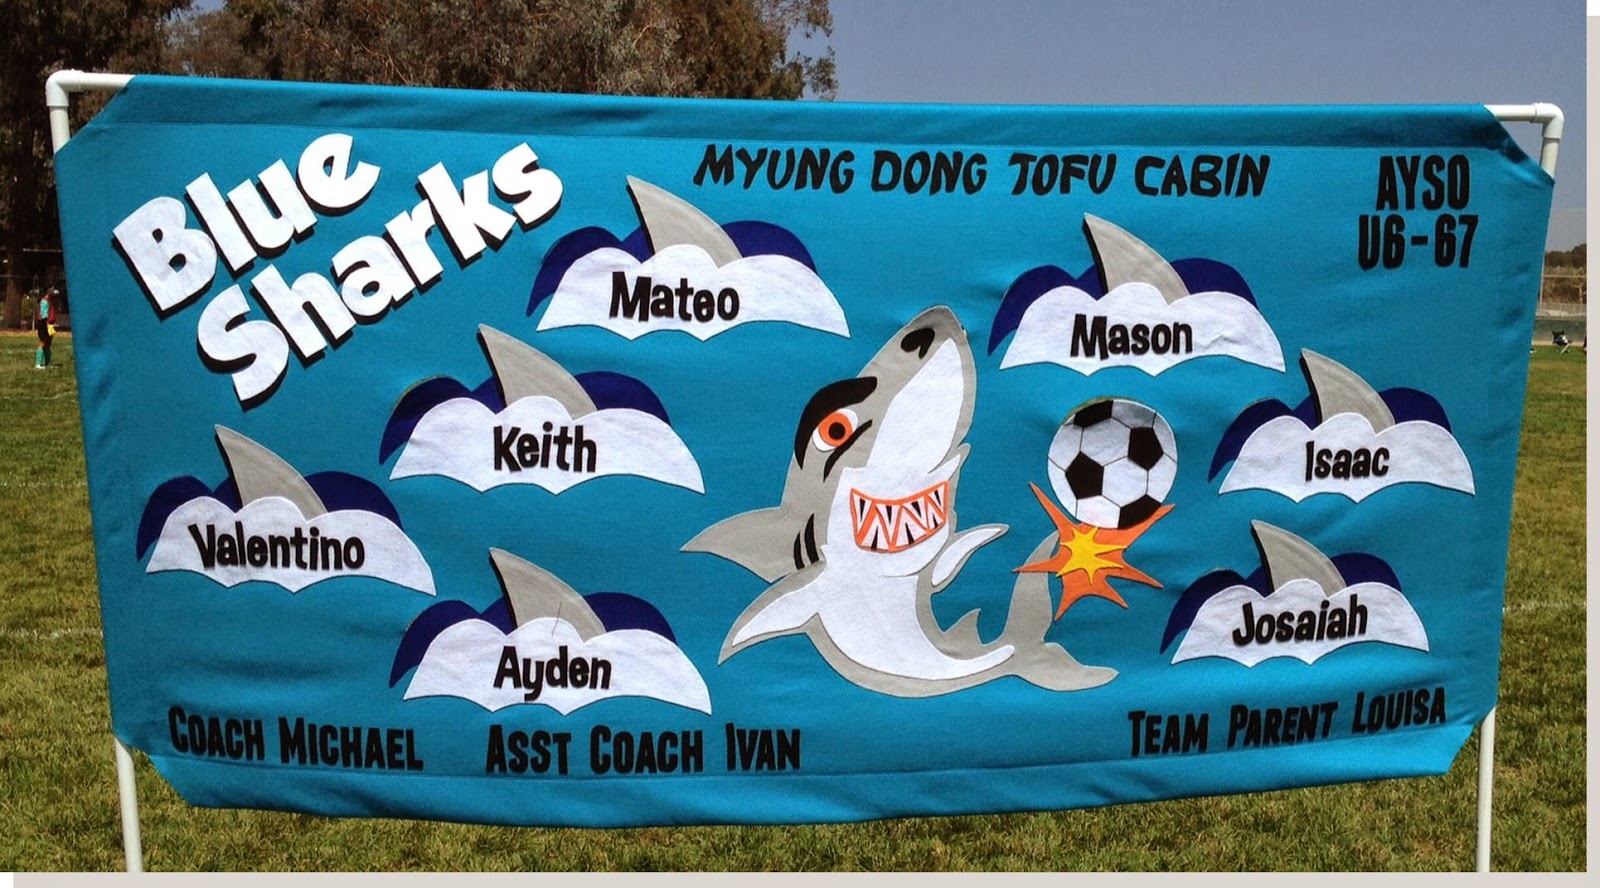
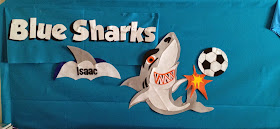
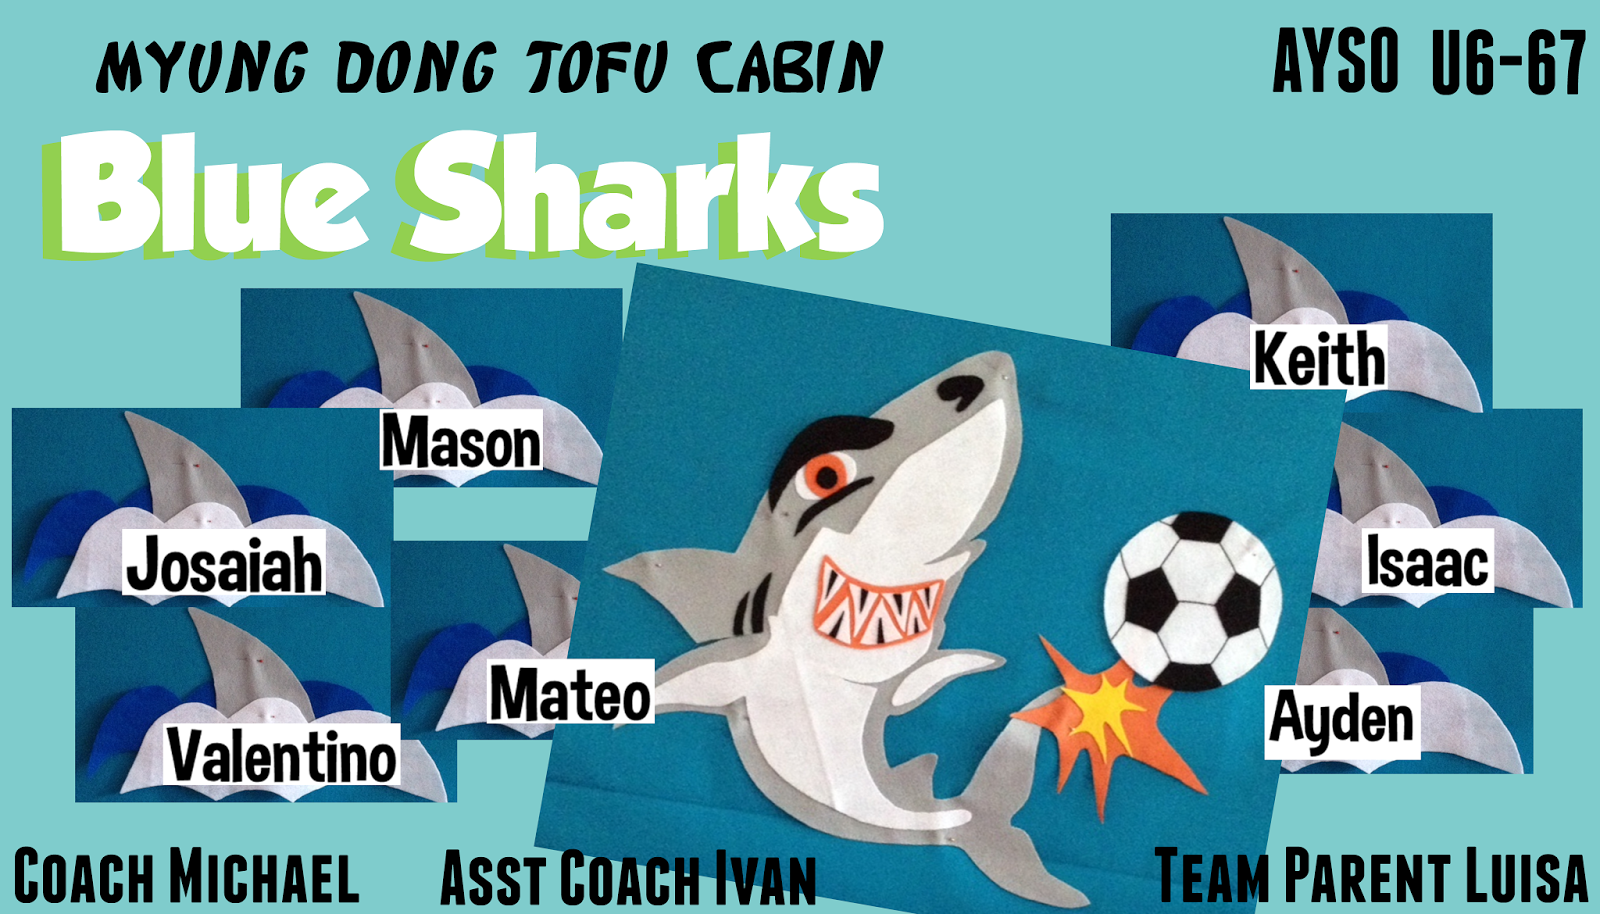
practice. The coach had the kids decide on the team name (Blue Sharks) and
asked for volunteers for Team Parent. Another parent volunteered, but said that
she didn’t have any creative skills and couldn’t do the banner. I told her that
although I’m not a crafter, I do have some sewing and quilting background and
could probably lead up the banner effort. The coach tore the Team Parent page
out of his handbook, then tore the page in half to give me the portion relating
to the banner. Thus began the process. Spoiler alert: See Sunday, August 31, item #1. This may save you many, many hours and headaches!
- Wednesday, August 27
- Found out the team color and name. In my case, the team was the Blue Sharks. The team’s jersey color was sky blue.
- Got specs for banner including
dimensions, letter height, content, etc.

- In our region, for child safety and working to de-identify the kids from potential creepers, we were asked to include either the player name or player numbers but not both.
- Googled “How to make soccer banner.” Maybe that’s how you landed on this page yourself. There are lots of helpful links, and I will include some of the ones that I found to be helpful here.
- Checked out Pinterest pages and Google images for terms like “soccer banner” to get a general survey of soccer banners that caught my eye.

- Thursday, August 28
No progress on banner.
- Friday, August 29 (heading into Labor Day weekend)
- Consulted with Julie, one of the owners of my local quilt shop who now has grown kids and is the quintessential “team mom.” I figured that if anyone knew about making team banners, she would. I was right. I learned several important tips from Julie, like the following:
- Use a PVC frame.
- Make the banner out of felt.
- Use Aleene’s Original Tacky Glue or hot glue gun. If you use Tacky Glue, allow 24 hours to dry.
- Get to Joann’s first before anything else, in case lots of other people in the area are doing the same thing at the same time – this could be a likely scenario.
- A common motif is to have a central image, surrounded by smaller icons representing each player. Each icon can have the player’s name.
- Sometimes teams cut out the part of the banner with each player’s name at the end of the season and give them to the players as a keepsake of the season.
- Cut wind vents in the banner prior to the first game, or you may be sorry.
- Having spoken with Julie, I felt a
lot more confident. I stopped by home to grab my Joann’s mailer with coupons,
then headed straight to Joann’s to get felt. Joann’s had a great selection of
72” wide felt on the bolt, and – BONUS – it was on sale for $2.99/yd,
discounted from the regular price of $4.99/yd. Because of the width of the
felt, I saw that we could easily get a single cut that could make the maximum
size of banner according to our banner specs, 4’ x 8’. I chose a blue for the
banner background that was similar to the team’s jersey color, and got 3.5
yards for the background. I didn’t have a specific design in mind, but
figured it would involve sharks or shark fins, soccer balls, and text that
would need to be seen. I also wanted to include some water-looking tones. I picked up some felt accent colors that I thought would “pop” against the blue,
black, white, and gray, if any additional emphasis might be needed. I bought 2
yards of black, 1 yard of white, 1 yard of royal blue, 1 yard of gray, 1 yard
of neon blue, and then ¼ yard each of accent colors.

I also bought a spool of thread matching the background for sewing the "pockets" for holding the PVC frame, and I saw a can of Aleene’s Tacky Fast Grab Spray that was on sale that I thought I might use (and did!)
- Got PVC tubing at Home Depot. The
banner specs required a PVC frame, and I had seen this video, which I found to
be very helpful.
I got three 10-ft lengths of ¾” PVC40 pipe. I had two of them cut into 6-ft lengths for the vertical bars of the frame. I had the third cut into an 8-ft length for the top horizontal bar of the frame. I asked a Home Depot employee to do the cuts. It didn’t cost anything to have the cuts made other than a lot of waiting around. To connect the horizontal bar to the vertical bars, I got two ¾” 90-degree connectors.
The video recommended two 4-ft lengths of 3/8” rebar (painted red on the end), which were easy to find.
It was kind of rusty and greasy to carry around, though. I realized that I had two 4-ft lengths of PVC left over from the lengths from which the 6-ft bars were cut, and I could store the rebar in those. I went back to the PVC area, and found these caps to make nice little holders for the rebar stakes (and keep my hands grease- and rust-free!)

- Got home and assembled the PVC
frame, spread out the background flannel, figured out how wide I wanted the “pockets”
for the PVC frame components to be. The guide here is close to what I did. I've included the key graphic from the linked website below.
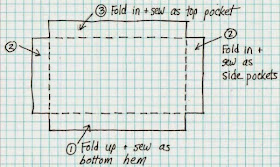
I allowed 3.75” for the “pockets”, and did not cut the squares out of the corners prior to sewing. I sewed a seam at around 3.5” and second one alongside 1/8” away. My rationale for this was for both seams to share some of the pulling and tugging from the wind instead of relying on a single seam. Now seeing the banner in action, I don’t think I would trust a seam done with a glue gun, and certainly not one done with Tacky Glue. I did not cut the corners prior to sewing because I wanted the corner seams to overlap for strength, as you can see in the photo.
I sewed the top seam first, then pinned the banner sides around the PVC frame. I made sure the banner would stretch taut – but not too tightly – between the vertical poles when assembled in the frame. The last seam was the bottom seam, measured to be finished 4-ft from the top. It isn’t strictly necessary to do a bottom seam, but I thought it would look better and that the bottom seam would add some structural integrity against the wind. After all 4 sides were sewn, I cut a 45-degree triangle outside of the corner seam, the same size from all 4 corners. Great, so now I have a great-looking blank slate, but now what?? - At this point, I ran through some options that I thought might work, including the following:
- Shark in middle, each boy's name with its own soccer ball around
- Ball splashing in wave, each boy's name with its own shark around
- Shark in middle, each boy's name with its own shark fin around
- Ball splashing in wave, each boy's name with its own shark fin around
- I threw together a Pinterest page

with some sample banners to show to the other team parents, and then gave them the four options to vote on. Two people responded. One of them was my husband. Option 3 was the winner. And I learned that parent participation was not looking good for the Labor Day weekend. I didn’t have much of a choice because this banner needed to be completed by Saturday the following week, September 6. - Another website that I found to be interesting and useful was this one. She has great photos documenting the process. Most helpful for me was her recommendation to use Microsoft Publisher. I’m not a design or publishing person, and until now I had never used MS Publisher. In fact, I didn’t even know that I had it included as part of my Microsoft Office 2010 suite on my computer until I checked. I ended up using it A LOT in the design of my banner, including for layout, printing, tiling, and sharing PDFs and updates with others. I will include progress in the designs to show how helpful this tool was. If you have access to it, use it! I found it to be quite intuitive and felt comfortable using it within minutes. A nice feature included the ability to make a background of any size, including 4’ x 8’. If you create a text box, with text that is a size you think looks good, you can zoom in and see how tall it is according to side rulers. You can manipulate images and text with quite a bit of flexibility.
- I googled images and clip art for sharks, shark fins, water splashing, soccer balls, etc. This was a kind of brainstorm of images. I did screenshots of the images that caught my eye using the Windows 7 “Snipping Tool”, and saved all of the screenshots to a screenshot folder. My only goal was to get ideas for a design.
- One thing I really wanted to do with the banner was use eye-catching fonts, something beyond what you could buy off-the-shelf at an office supply store. I found some great fonts that were easy to install on my PC and were free. I tried to make sure that the fonts were sans serif fonts that weren't too fussy in order to minimize cutting grief.


- Came up with the first draft of
banner.

- Made sure that the kids’ names
were 3” tall as in the banner specs. I turned each name into an image (jpeg or
png) by taking a screenshot of their name in the font I wanted to use, zoomed
in on the screen. One limitation of MS Publisher is that it won’t turn the text (as part of a text box) into the mirror image. I wanted to print the mirror image in order to stick
the paper onto the back of the felt and cut out the letters.

When each name is an image, I import it into Publisher, superimpose it onto the forward-facing name, then scale it until it’s the correct size. With the name as an image, I could "flip" the image to get the mirror image. At that point I could move it to a blank 4’ x 8’ document for printing. Hint: I changed the color of the font to a light grayscale to save on inkjet printing. I used the Aleene’s Tacky Fast Grab Spray to adhere the paper to the felt. I cut out the letters using kitchen shears
and sharpening frequently.
- Once I had the longest name, I
drew a wave to be made out of white that would be large enough to accommodate the
entire name. I made a pattern out of that wave, then made a pattern for a
background wave and a shark fin.
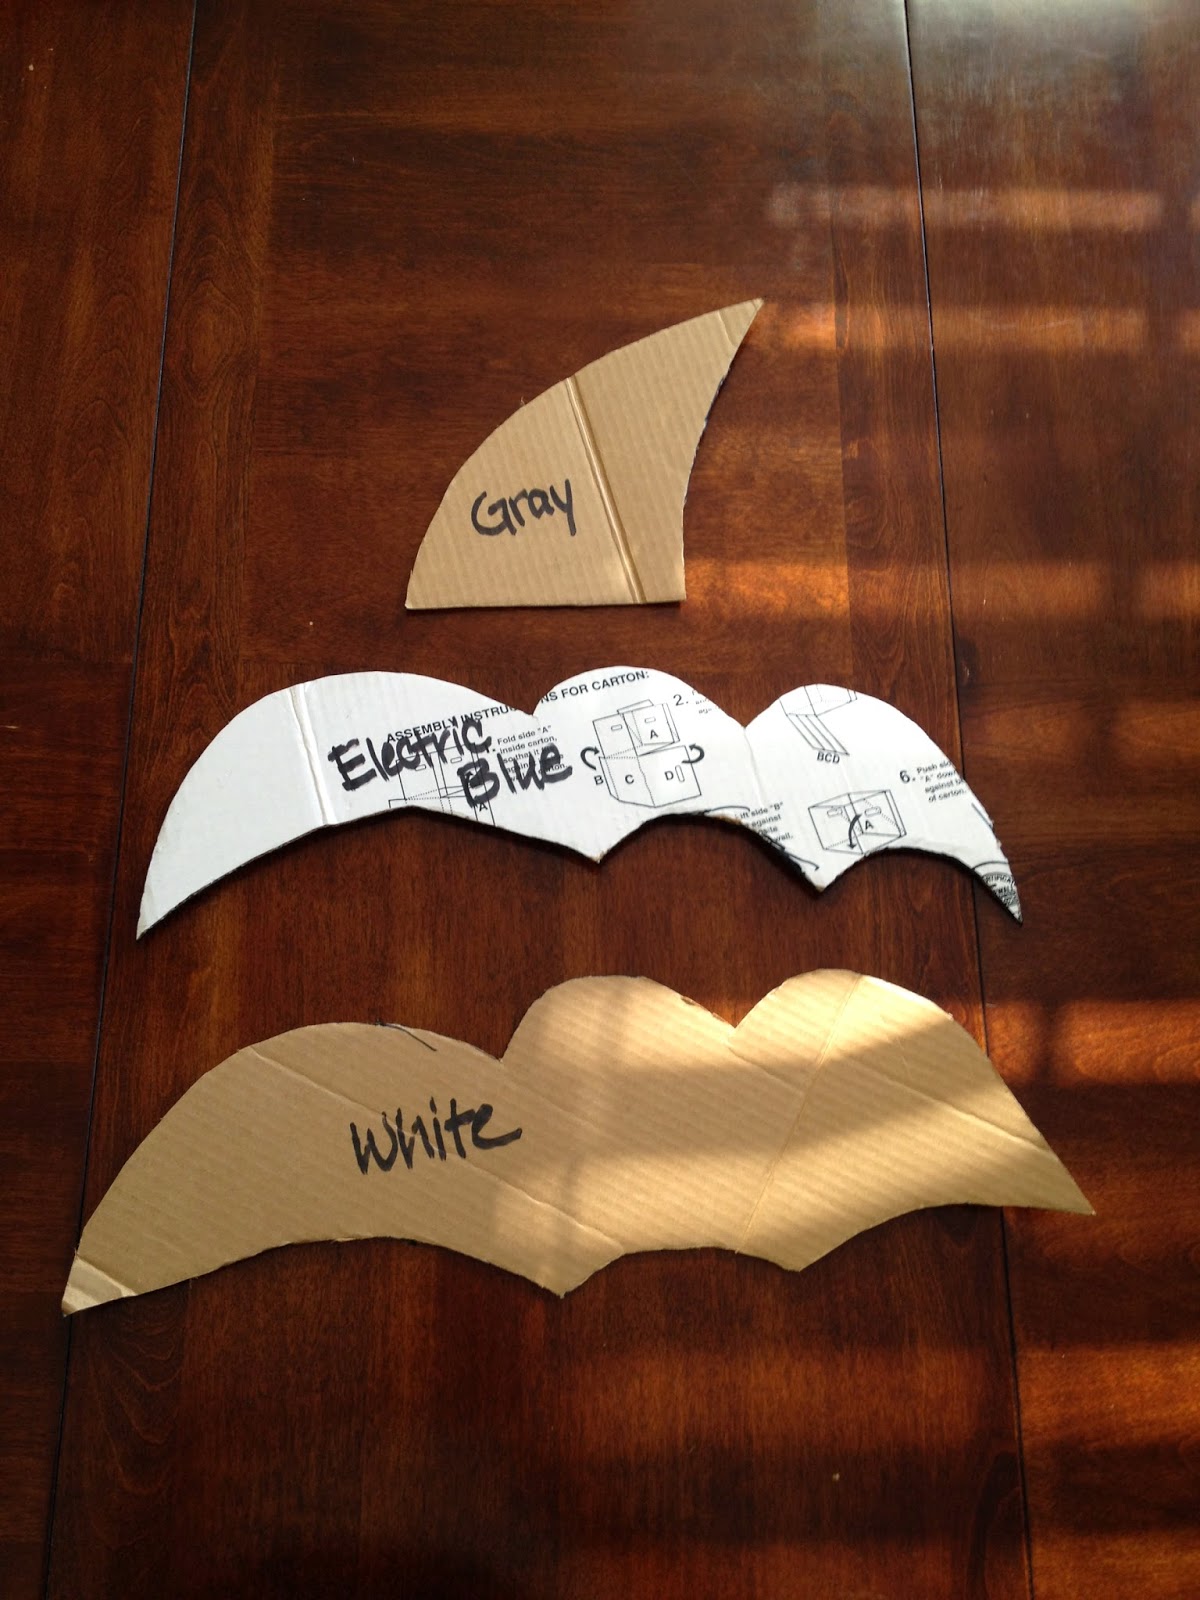
I traced around these with a Sharpie pen onto the appropriate colors of felt. These were something I could pass on to other people to cut out.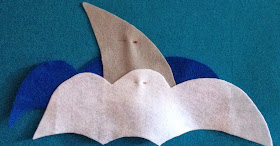


- We went to church in the morning, and I told one of my mom friends that I was up to my eyeballs in soccer banner making. She looked straight at me and laughed. Then she asked whether I knew that people don’t really make their banners, they pay to have vinyl banners printed up. I groaned. Yes, I had seen all of these vinyl banners online as I was looking up banner ideas and instructions, but the banner specs didn’t say *anything* about those as usable options. Ugh. Well, I was already committed at this point, having spent a lot of time and more than $40 at Joann’s. I felt very, very silly, to say the least. Check out something like this for great prices.
- So the next big job was going to
be making the shark. I figured that I could print the shark in tiles straight
from MS Publisher. I didn’t know how much paper and printer ink that was going
to take, and I was running dangerously low on printer ink. We had ordered some more, but
had ordered the wrong pack of cartridges and would not be getting the correct
ones until Tuesday. Then I had what turned out to be a fortuitously great idea,
to call my friend Tom. I knew that Tom had a projector at his house that could
project from computer onto a screen or wall. I thought that if he was home in the
afternoon, I could swing by, project the shark image, trace onto some
newsprint, and continue on with some pattern making. He told me to come by.
When he saw what I was working on, he was excited for a bit of distraction from
the drudgery of the paperwork he had been doing. It turned out that he had done
some similar activities as part of architecture school. We got the image
projected to the size I wanted, and he talked me into using some higher-quality
paper than the newsprint I had originally planned to use.

- He then offered up some
information I didn’t even ask about regarding transferring the image to
textiles. He described a process where you punch small holes along the
pattern,

sprinkle powder through the holes,
and transfer the pattern. That way, the pattern can be reused indefinitely without destroying it. In the case of the shark image, it could be useful for maintaining the layers of the white vs. gray. I was excited to try this. I felt like my Montessori-educated kids, punching out the pattern. Baby powder worked great for transferring the pattern onto the gray felt.
I had to figure out what to use for the white felt, though. I went to the kitchen, checked out the spice cabinet, and eventually tried out the cinnamon.It worked, and brushed out of the white felt afterward quite well. I think that it helped that I used the cinnamon *after* the powder and thus had some cinnamon mixed with powder. It seemed to brush out more easily than the test spots I did with straight cinnamon. I used the cinnamon both for the white on the shark as well as for the lines on the soccer ball.

I used the powder transfer method to get the orange and yellow portions of the mouth and "smash". I cut out the teeth freehand, as well as the eyebrows, eye, gills, and nostril. - The best way I could think of to render the lines on the soccer ball was to do a tight zig-zag on my sewing machine using black thread, following along the cinnamon-dotted lines. The black patches were cut out from black felt, pattern transferred by baby powder, and adhered with Tacky Glue.
- Once everything was transferred, I
cut, trimmed, and glued. The gluing on the shark was an iterative process over
a few days to get all the edges firmly glued down. The same goes for the rest
of the banner.

- Next, I got all of the other text on the banner printed the correct size, mirror image, and adhered to the correct color of felt. This was something that I could pass on to some other parents who helped out with cutting. Tip: use small zipper bags to hold words or phrases, and write the contents in Sharpie. This makes it much easier to stay organized and lay out the banner for gluing. Reuse the bags by scribbling out previous contents and labeling current contents.


- I realized that the shark fins and
the “Blue Sharks” text would stand out a lot more if they had some offset
shadowing in black. Just a little more effort for a really sharp effect? Sure,
I’ve done this much already…
- Gluing, gluing, gluing.

Names to white waves. Shark fins to white waves. Basically, as elements were cut out and could be glued to each other (but not to the banner yet), I would start gluing. As the glue dried over the day, apply more glue to get edges firmly glued down.

Notice how the fold lines are gone from the shark and the background. I used a towel between the felt and steam iron, not sure whether direct contact would melt the felt. Not worth tempting fate at this point!


- Initial gluing of two layers of
Blue Sharks text, one white, one black. Overlapped them initially, taped them
with painter tape to maintain alignment, then offset them and glued white onto
black.


- After I got all of the cutting
back from the other two parents who helped with the cutting, I trimmed and made
sure we had everything. I did the banner layout, tacked everything down with
Tacky Glue.
- Did a nearly final gluing to try to get all edges adhered.
- Cut wind vents around first bump
of all background waves,

shark nose,
top of soccer ball.
Did final gluing.


First Game! Banner was a big hit with the kids!
Wrap Up
In the end, I went to the following four stores for supplies:
- Home Depot (PVC supplies and rebar stakes)
- Joann's (felt, thread, glue, spray adhesive)
- Dollar Tree (blue painter's tape)
- FedEx/Kinkos (copies)
The blue tape probably could have been purchased at Home Depot, and the copies could have been done at home had my ink not have run out in my printer. Strictly speaking, in retrospect and with preparation, everything could have been accomplished by visiting only two stores, Home Depot (or something like it) and Joann's Fabrics (or something like it).
Here was the final cost breakdown:
number
|
unit price
|
price
|
discounted price
|
||||
| Home Depot | PVC 10' lengths | 3 | 2.22 | 6.66 | 6.66 | ||
| PVC 90 degree | 2 | 0.35 | 0.70 | 0.70 | |||
| PVC caps | 4 | 0.39 | 1.56 | 1.56 | |||
| rebar | 2 | 2.26 | 4.52 | 4.52 | |||
| Joanns | felt | 10.5 | 2.99 | 31.40 | 26.69 |
15% discount
|
|
| thread | 1 | 1.97 | 1.97 | 1.67 |
15% discount
|
||
| glue 8oz | 2 | 3.99 | 7.98 | 6.78 |
15% discount
|
||
| glue 4oz | 2 | 1.99 | 3.98 | 3.38 |
15% discount
|
||
| spray | 1 | 3.97 | 3.97 | 3.37 |
15% discount
|
||
| Dollar Tree | tape | 1 | 1.00 | 1.00 | 1.00 | ||
| FedEx/Kinkos | copies | 1 | 3.84 | 3.84 | 3.84 | ||
subtotal
|
tax (9.25%)
|
TOTAL
|
|||||
| 60.18 | 5.57 | 65.75 |
We kept the price to a minimum, cute to a maximum, and learned a few things in the process. Everyone wins!
Thank you so much for posting this!! This is our third season doing soccer and the team banner has always been something that seemed so complicated and scary and one of the last things I wanted to do but somehow I ended up volunteering to do it. Like you, I have some sewing and quilting background and I'm a bit of a perfectionist so your post was the main one I referred to. The banner came out great, got a lot of positive feedback from everyone.
ReplyDeleteI used your trick of poking holes and using powder to transfer the pattern of the soccer ball but for all the letters I found it easier to just print them out, cut them and then use painter's tape to stick the paper to the felt and cut around that.
I didn't have MS Office so I mostly used google docs for my fonts, although in the end I did sign up for a trial Office and was able to use a font I downloaded for the team name. I didn't have a big image as a centerpiece, in part b/c I ran out of room after making a soccer ball for each player and partly b/c w/o Publisher (which I didn't get until the last minute), I couldn't figure out a way to get any big images.
Thanks again for this post, it was super helpful and I'm sure I'll refer to it again if I make another banner!
Thanks for great article about custom pvc banner printing.
ReplyDeletePVC Banner Printing
Hello would you mind letting me know which web host you're working with? I've loaded your blog in 3 different internet browsers and I must say this blog loads a lot faster then most. Can you recommend a good hosting provider at a fair price? Thanks a lot, I appreciate it! Montreal sign repair
ReplyDeleteNice Blog.!
ReplyDeletePVC Banner Printing
Vinyl Banner Printing
terimakasih untuk informasinya dan silahkan kunjungi web kami
ReplyDeletehttp://fauziaherbal.com
http://mitoha-goldengamat.com/
http://obatkelenjargetahbening.xyz/
Thanks for sharing artile about PVC, Vinyl Banner Printing
ReplyDeletePVC, Vinyl Banner Printing
Nice, this articles are excellent and very helpful. Thanks
ReplyDeleteRoll Up Banners
business card printing
Six years later, and this is still the best banner EVER.
ReplyDeleteOur Standard vinyl banner material is a high quality 550gsm base material designed specifically for printed banners. PVC Banners
ReplyDeletenice looking your blog with the great information keep sharing with us
ReplyDeletePull Up Banner Printing
pull Up banner Printing
Magnet Printing
Business Cheque Printing
Mug Printing
Rush printing
Brochure Printing
Discount Printing
Flag Sign Printing